
티스토리 뷰
UITableViewDiffableDataSource의 4가지 apply 메서드 글에서 진행한 간단한 예제를 계속 활용해서
헷갈리는 부분을 테스트해보겠습니다.
[1] 아이템이나 인덱스 찾을 때, datasource API를 써야할까 vs snapshot API를 써야할까?
UITableViewDiffableDataSource 는 아래와 같은 API가 있고
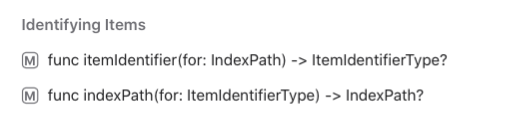
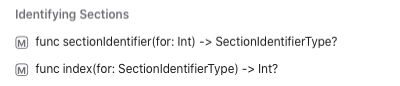
NSDiffableDataSouceSnapshot은 아래와 같은 API가 있습니다.
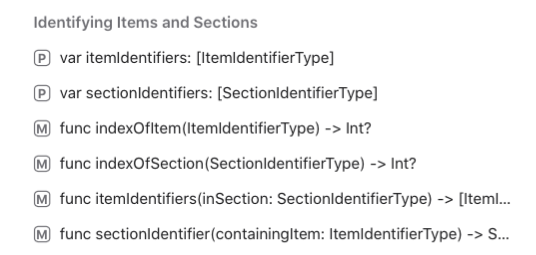
각각을 활용해서 할 수 있는 것들을 나열해보겠습니다. (iOS 13 기준!!)
어떤 것을 쓰던 상관없지만,,
✔️ Section이 여러개 있는 화면이라면 snapshot API // multiple sections 관련해서 다양한 기능을 제공하니까
✔️ 제가 작성한 예제처럼(Section 하나, Row 들은 고정) 아주 간단한 화면이라면 dataSource API // 더 간단하고 편하니까
를 활용할 것 같습니다.
아니면 dataSource API, snapshot API 를 둘다 활용하는 방법도 있겠네요!
[2] snapshot의 reload
NSDiffableDataSouceSnapshot 는 Reloading Data 관련 메서드들 제공합니다.
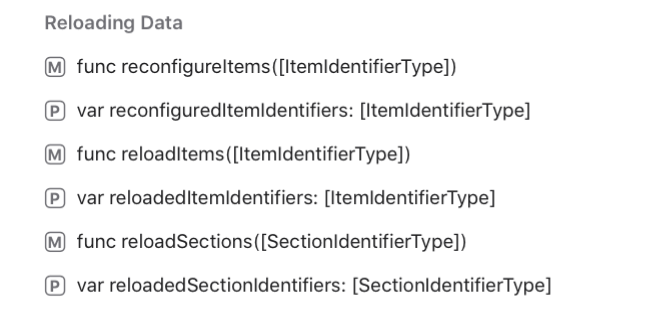
우리가 tableView에서 해줬던 reload 랑 이름이 같아서 문득 헷갈릴 수 있는데
오직 데이터만!!!! 업데이트 해주는 것임을 잊지 말아야합니다.
예를들어서 예제를 이렇게 바꿔볼게요! (체크친 부분을 추가했습니다.)
저렇게 snapshot reload만 해주면 테이블뷰에 반영이 안됩니다!
dataSource.apply 까지 해줘야지 cellProvider가 불리고 테이블뷰가 업데이트 됩니다
func updateTexts() {
    dogText = "갱얼쥐"
    catText = "고냥이"

    var snapshot = dataSource.snapshot()
    snapshot.reloadSections([.main])
    ✅ dataSource.apply(snapshot, animatingDifferences: true)
 }
또는 iOS 15이상이라면 applyUsingReloadData 를 사용하는 방법도 있습니다.
cellProvider가 불리고 테이블뷰가 업데이트 됩니다.
func updateTexts() {
    dogText = "갱얼쥐"
    catText = "고냥이"

    ✅ dataSource.applySnapshotUsingReloadData(dataSource.snapshot())
 }
---- 그외 테스트해본 것들 기록 ------
func updateTexts() {
    dogText = "갱얼쥐"
    catText = "고냥이"

    var snapshot = dataSource.snapshot()
    snapshot.reloadItems([.dog])
    dataSource.apply(snapshot, animatingDifferences: true)
 }


 => DogCell만 업데이트됨.
func updateTexts() {
dogText = "갱얼쥐"
catText = "고냥이"
var snapshot = dataSource.snapshot()
snapshot.reloadItems([.dog])
dataSource.applySnapshotUsingReloadData(snapshot)
}
=> DogCell, CatCell 모두 업데이트 됨.
참고로 저는 reload만 종종 헷갈려서 reload만 적었는데 insert, delete 도 동일합니다!
apply 까지 해줘야지 테이블뷰가 업데이트 됩니다.
func deleteItems() {
    var snapshot = dataSource.snapshot()
    snapshot.deleteItems([.dog])
    ✅ dataSource.apply(snapshot, animatingDifferences: true)
}
[3] 모든 항목을 지울때, 현재 snapshot의 deleteAllItems를 해주기 vs new Snapshot 적용하기 애니메이션 효과가 같을까?
모든 항목을 지울 때 두가지 방법으로 해줄 수 있는데요
첫번째, 현재 snapshot의 deleateAllItems 해주고 apply 하기
func deleteAllItems() {
    var snapshot = dataSource.snapshot()
    snapshot.deleteAllItems()
    dataSource.apply(snapshot, animatingDifferences: true)
 }
두번째, 새로운 snapshot apply 하기
func deleteAllItems() {
    let snapshot = Snapshot()
    dataSource.apply(snapshot, animatingDifferences: true)
}
이 둘의 애니메이션 효과는 똑같을까요?
테스트해본 결과 둘다 이런 애니메이션 효과를 가집니다

저렇게 파다닥 거리는 게 싫으면
이렇게 해줄 수 도 있구요
func deleteAllItems() {
    var snapshot = dataSource.snapshot()
    snapshot.deleteItems(Row.allCases)
    dataSource.apply(snapshot, animatingDifferences: true)
}

더 좋은 방법은 DataSource의 defaultRowAnimation 을 지정해주는 것입니다!
위와 같은 효과를 내려면 top으로 지정해주면 됩니다.
func deleteAllItems() {
    let snapshot = Snapshot()
    dataSource.defaultRowAnimation = .top
    dataSource.apply(snapshot, animatingDifferences: true)
}
'🍏 > iOS' 카테고리의 다른 글
| [iOS] status bar hidden / navigation bar shrink or overlap (0) | 2022.10.28 |
|---|---|
| [iOS] Swift Package 에서 RELEASE Flag 사용하기 (0) | 2022.07.04 |
| [iOS] UITableViewDiffableDataSource의 4가지 apply 메서드 (0) | 2022.06.28 |
| [iOS] Edit Menus (UIMenuController) 커스터마이징 (2) | 2022.06.03 |
| [iOS] RxSwift 로 살펴보는 써드파티 라이브러리 5가지 사용 방법 (0) | 2022.03.12 |
- Total
- Today
- Yesterday
- 장고 Custom Management Command
- 플러터 싱글톤
- Flutter 로딩
- flutter dynamic link
- cocoapod
- Watch App for iOS App vs Watch App
- 장고 URL querystring
- flutter 앱 출시
- Flutter Text Gradient
- github actions
- ribs
- drf custom error
- Dart Factory
- Django FCM
- Flutter getter setter
- Sketch 누끼
- PencilKit
- ipad multitasking
- SerializerMethodField
- METAL
- Flutter Clipboard
- 플러터 얼럿
- Flutter Spacer
- flutter build mode
- Django Firebase Cloud Messaging
- Python Type Hint
- flutter deep link
- DRF APIException
- 구글 Geocoding API
- Django Heroku Scheduler
| 일 | 월 | 화 | 수 | 목 | 금 | 토 |
|---|---|---|---|---|---|---|
| 1 | 2 | 3 | 4 | 5 | 6 | 7 |
| 8 | 9 | 10 | 11 | 12 | 13 | 14 |
| 15 | 16 | 17 | 18 | 19 | 20 | 21 |
| 22 | 23 | 24 | 25 | 26 | 27 | 28 |
| 29 | 30 |