
티스토리 뷰
[ 니즈 ]
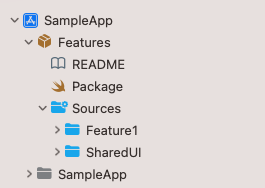
이렇게 된 구성에서
1. SharedUI 안에 커스텀 폰트를 넣고 프리뷰로 커스텀 폰트를 보고 싶음.
2. SharedUI 를 의존하는 Feature1 타겟의 프리뷰로 커스텀 폰트를 보고 싶음.
3. 앱의 UIKit 기반 코드에서도 SharedUI의 커스텀 폰트를 쓰고 싶음.
[ 작업 ]
~~ 귀여운 마루부리 폰트와 함께하는 예제 ~~
# 1.
폰트파일을 넣을 폴더를 원하는 경로에 만들고

Pacakge > resources 추가하기
// swift-tools-version: 5.5
// The swift-tools-version declares the minimum version of Swift required to build this package.

import PackageDescription

let package = Package(
    name: "Features",
    platforms: [.iOS(.v14)],
    products: [
        .library(
            name: "Feature1",
            targets: ["Feature1"]
        ),
        .library(
            name: "SharedUI",
            targets: ["SharedUI"]
        )
    ],
    dependencies: [],
    targets: [
        .target(
            name: "Feature1",
            dependencies: [
                "SharedUI"
            ]
        ),
        .target(
            name: "SharedUI",
            ✅ resources: [
                .process("Resources/CustomFonts")
            ]
        )
    ]
)
# 2.
커스텀 폰트를 register 하는 코드 작성하기!
앱에서는 info.plist > Fonts Provied By Application 에 커스텀 폰트를 등록했다면
패키지에서는 별도의 코드로 등록해줘야한다.
https://github.com/jgale/SwiftUICustomFonts 코드를 참고했다. (감사합니당) // CTFontManagerRegisterFontsForURL
struct CustomFontName {
    static let maruBuri = "MaruBuri-Regular"

    static var all: [String] { [maruBuri] }
}

public struct Fonts {

    public static func registerCustomFonts() {
        CustomFontName.all.forEach { font in
            guard let url = Bundle.module.url(forResource: font, withExtension: "ttf") else { return }
            CTFontManagerRegisterFontsForURL(url as CFURL, .process, nil)
        }
    }
}

public extension View {
    /// Attach this to any Xcode Preview's view to have custom fonts displayed
    /// Note: Not needed for the actual app
    func loadCustomFonts() -> some View {
        Fonts.registerCustomFonts()
        return self
    }
}
그리고
앱의 entry point 에서 registerCustomFonts 를 호출해주면 된다.
패키지 > 프리뷰 볼 때는 loadCustomFonts 를 사용해주면 된다.
# 3.
커스텀 폰트 함수 만들기!
extension 해도 좋고
public extension UIFont {

    static func maruBuri(_ size: CGFloat) -> UIFont {
        return UIFont(name: CustomFontName.maruBuri, size: size) ?? ...
    }
}

public extension Font {

    static func maruBuri(_ size: CGFloat) -> Font {
        return .custom(CustomFontName.maruBuri, size: size)
    }
}
구조체 안에 넣어도 좋고,,
public struct Fonts {

    public static func maruBuri(_ size: CGFloat) -> UIFont {
        return UIFont(name: CustomFontName.maruBuri, size: size) ?? UIFont.systemFont(ofSize: size)
    }

    public static func registerCustomFonts() {
       ...
    }
}
원하는 방식으로 해준다.
참고로
Font -> UIFont 로 변환하는 API는 있지만 // init(CTFont)
UIFont -> Font로 변환하는 것은 없다.
(Font -> UIFont 도 사실 CTFont로 한번 바꿔야하는 중간단계가 있기는 하다,,)
extension Font {

    init(_ uiFont: UIFont) {
        self = Font(uiFont as CTFont)
    }
}
[ 결과 ]
1. SharedUI 안에 커스텀 폰트를 넣고 프리뷰로 커스텀 폰트를 보고 싶음. -> 🆗

2. SharedUI 를 의존하는 Feature1 타겟의 프리뷰로 커스텀 폰트를 보고 싶음. -> 🆗

3. 앱의 UIKit 기반 코드에서도 SharedUI의 커스텀 폰트를 쓰고 싶음. -> 🆗
import UIKit
import SharedUI

class ViewController: UIViewController {

    override func viewDidLoad() {
        super.viewDidLoad()

        ...
        label.font = UIFont.maruBuri(20)
    }
}

'🍏 > iOS' 카테고리의 다른 글
| [iOS] external view hierarchy debugger (1) | 2023.10.26 |
|---|---|
| [StoreKitTest] StoreKit Configuration File > Price Locale 바꾸는 법 (0) | 2023.08.08 |
| [iOS] Library, Framework, Swift Package (0) | 2022.11.06 |
| [iOS] object_setClass 의 위험성 (0) | 2022.11.04 |
| [iOS] status bar hidden / navigation bar shrink or overlap (0) | 2022.10.28 |
- Total
- Today
- Yesterday
- drf custom error
- Django FCM
- flutter build mode
- ribs
- METAL
- 장고 URL querystring
- flutter deep link
- DRF APIException
- 플러터 싱글톤
- PencilKit
- Django Firebase Cloud Messaging
- 플러터 얼럿
- flutter 앱 출시
- Dart Factory
- Flutter getter setter
- Python Type Hint
- Flutter Spacer
- Sketch 누끼
- Flutter Text Gradient
- Flutter 로딩
- 구글 Geocoding API
- Django Heroku Scheduler
- Flutter Clipboard
- 장고 Custom Management Command
- ipad multitasking
- github actions
- Watch App for iOS App vs Watch App
- SerializerMethodField
- cocoapod
- flutter dynamic link
| 일 | 월 | 화 | 수 | 목 | 금 | 토 |
|---|---|---|---|---|---|---|
| 1 | 2 | 3 | ||||
| 4 | 5 | 6 | 7 | 8 | 9 | 10 |
| 11 | 12 | 13 | 14 | 15 | 16 | 17 |
| 18 | 19 | 20 | 21 | 22 | 23 | 24 |
| 25 | 26 | 27 | 28 | 29 | 30 | 31 |